一、事务控制
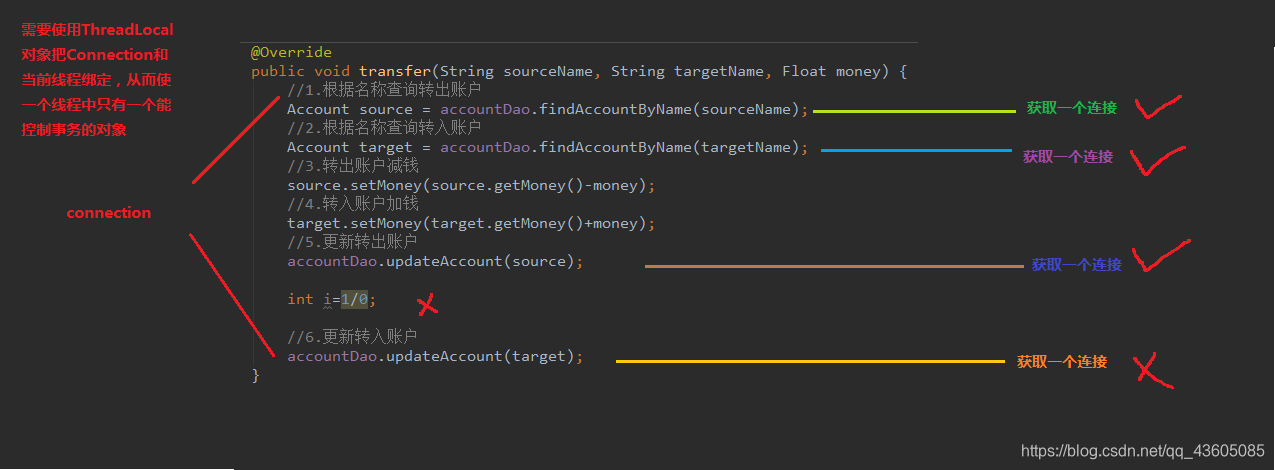
事务我们在java web中有涉及。Spring中 我们使用了 connection 对象的 setAutoCommit(true)此方式控制事务,如果我们每次都执行一条 sql 语句,没有问题,但是如果业务方法一次要执行多条 sql语句,这种方式就无法实现功能了。
解决办法:
让业务层来控制事务的提交和回滚。(这个我们之前已经在 web 阶段讲过了)
改造后的业务层实现类:
用 注:此处没有使用 spring 的 的IOC.
public class AccountServiceImpl implements IAccountService {
private IAccountDao accountDao = new AccountDaoImpl();
@Override
public List<Account> findAllAccount() {
List<Account> accounts = null;
try {
TransactionManager.beginTransaction();
accounts = accountDao.findAll();
TransactionManager.commit();
return accounts;
} catch (Exception e) {
TransactionManager.rollback();
e.printStackTrace();
}finally {
TransactionManager.release();
}
return null;
}
......
}
|
下面来看一下这两个工具类 ConnectionUtils 和 TransactionManager
1.ConnectionUtils
连接的工具类,它用于从数据源中获取一个连接,并且实现和线程绑定,所以之后我们获取当前线程的连接便可以直接connectionUtils.getThreadConnection()
public class ConnectionUtils {
private ThreadLocal<Connection> tl = new ThreadLocal<Connection>();
private DataSource dataSource;
public void setDataSource(DataSource dataSource) {
this.dataSource = dataSource;
}
public Connection getThreadConnection() {
try {
Connection connection = tl.get();
if (connection == null) {
connection = dataSource.getConnection();
tl.set(connection);
}
return connection;
}catch (Exception e) {
throw new RuntimeException(e);
}
}
public void removeConnection() {
tl.remove();
}
}
|
2.TransactionManager
和事务管理相关的工具类,它包含了:开启事务,提交事务,回滚事务和释放连接(总管理)
例如:connectionUtils.getThreadConnection().setAutoCommit(false); 就等价于connection.setAutoCommit(false);
**
* 和事务管理相关的工具类,它包含了:开启事务,提交事务,回滚事务和释放连接
* @author Mango
*/
public class TransactionManager {
private ConnectionUtils connectionUtils;
public void setConnectionUtils(ConnectionUtils connectionUtils) {
this.connectionUtils = connectionUtils;
}
public void beginTransaction() {
try {
connectionUtils.getThreadConnection().setAutoCommit(false);
} catch (SQLException e) {
e.printStackTrace();
}
}
public void commit() {
try {
connectionUtils.getThreadConnection().commit();
} catch (SQLException e) {
e.printStackTrace();
}
}
public void rollback() {
try {
connectionUtils.getThreadConnection().rollback();
} catch (SQLException e) {
e.printStackTrace();
}
}
public void release() {
try {
connectionUtils.getThreadConnection().close();
connectionUtils.removeConnection();
} catch (SQLException e) {
e.printStackTrace();
}
}
}
|
3.新的问题
上一小节的代码,通过对业务层改造,已经可以实现事务控制了,但是由于我们添加了事务控制,也产生了一
个新的问题:
@Override
public List<Account> findAllAccount() {
try {
txManager.beginTransaction();
List<Account> accounts = accountDao.findAllAccount();
txManager.commit();
return accounts;
}catch (Exception e){
txManager.rollback();
throw new RuntimeException(e);
}finally {
txManager.release();
}
}
@Override
public Account findAccountById(Integer accountId) {
try {
txManager.beginTransaction();
Account account = accountDao.findAccountById(accountId);
txManager.commit();
return account;
}catch (Exception e){
txManager.rollback();
throw new RuntimeException(e);
}finally {
txManager.release();
}
}
|
业务层方法变得臃肿了,里面充斥着很多重复代码。并且业务层方法和事务控制方法耦合了。
试想一下,如果我们此时提交,回滚,释放资源中任何一个方法名变更,都需要修改业务层的代码,况且这还只是一个业务层实现类,而实际的项目中这种业务层实现类可能有十几个甚至几十个。
二、动态代理回顾

1、 动态代理的特点
(1)字节码随用随创建,随用随加载。
(2)它与静态代理的区别也在于此。因为静态代理是字节码一上来就创建好,并完成加载。
(3)装饰者模式就是静态代理的一种体现。
2.动态代理的作用
**不修改源码的基础上对方法增强**
3.动态代理的分类:
(1)基于接口的动态代理
(1)基于接口的动态代理:
涉及的类:Proxy
提供者:JDK官方
如何创建代理对象:
使用proxy类中的newProxyInstance方法(要求:被代理的类至少实现其一个接口(例如IProducer,而不能用Producer来实现),如果没有就不能使用)
newProxyInstance方法
参数:1.ClassLoader:类加载器
   它是用于加载 代理对象字节码的。被代理对象的类加载器(固定写法)。

   2Interfaces:字节码数组
   它是用于让代理对象和被代理对象有相同的方法,实现相同的接口。(固定写法)

   3.InvocationHandler:用于提供增强的代码
   它是让我们写如何代理。我们一般都是写一个该接口的实现类,通常情况下都是匿名内部类,但不是必须
   此接口的实现类都是谁用谁写。
public class Client {
public static void main(String[] args) {
final Producer producer = new Producer();
IProducer proxyProducer =(IProducer) Proxy.newProxyInstance(
参数(1)producer.getClass().getClassLoader(),
参数(2)producer.getClass().getInterfaces(),
参数(3)new InvocationHandler() {
public Object invoke(Object proxy, Method method, Object[] args) throws Throwable {
Object returnValue = null;
Float money = (Float) args[0];
if("saleProduct".equals(method.getName())) {
returnValue = method.invoke(producer, money * 0.8f);
}
return returnValue;
}
});
proxyProducer.saleProduct(10000f);
}
}
|
(2)基于子类的动态代理
基于子类的动态代理
提供者:第三方的 CGLib,如果报 asmxxxx 异常,需要导入 asm.jar。需要导入jar包
要求:被代理类不能用 final 修饰的类(最终类)。
使用 CGLib 的 的 Enhancer 类创建代理对象
(2)基于子类的动态代理:
涉及的类:Enhancer
提供者:第三方cglib库
如何创建代理对象:
   使用Enhancer中的create方法(要求:被代理的类不能是最终类)

create中的参数:
   1.class:字节码
       用于指定被代理对象的字节码(这里Producer被代理)
   2.callback:用于提供增强的代码
       一般写的都是该接口的子接口实现类:MenthInterceptor
public class Client {
public static void main(String[] args) {
final Producer producer = new Producer();
Producer cglibProducer =(Producer) Enhancer.create(producer.getClass(), new MethodInterceptor() {
public Object intercept(Object o, Method method, Object[] objects, MethodProxy methodProxy) throws Throwable {
Object returnValue = null;
Float money = (Float) objects[0];
if("saleProduct".equals(method.getName())) {
returnValue = method.invoke(producer, money * 0.8f);
}
return returnValue;
}
});
cglibProducer.saleProduct(10000f);
}
}
|
三、动态代理实现事务控制
1.用于创建service代理对象的factory
解决案例中的问题:
创建客户业务层对象工厂(当然也可以创建其他业务层对象,只不过我们此处不做那么繁琐)
public class BeanFactory {
private IAccountService accountService;
public final void setAccountService(IAccountService accountService) {
this.accountService = accountService;
}
private TransactionManager transactionManager;
public void setTransactionManager(TransactionManager transactionManager) {
this.transactionManager = transactionManager;
}
public IAccountService getAccountService() {
return (IAccountService) Proxy.newProxyInstance(accountService.getClass().getClassLoader(),
accountService.getClass().getInterfaces(),
new InvocationHandler() {
@Override
public Object invoke(Object proxy, Method method, Object[] args) throws Throwable {
Object returnValue = null;
try {
transactionManager.beginTransaction();
returnValue = method.invoke(accountService, args);
transactionManager.commit();
return returnValue;
} catch (Exception e) {
transactionManager.rollback();
throw new RuntimeException(e);
} finally {
transactionManager.release();
}
}
});
}
}
|
2.配置依赖注入
<bean id="proxyAccountService" factory-bean="beanfactory" factory-method="getAccountService"></bean>
<bean id="beanfactory" class="com.itheima.factory.BeanFactory">
<property name="accountService" ref="accountService"></property>
<property name="transactionManager" ref="transactionManger"></property>
</bean>
|
3.service层与测试类
当我们改造完成之后,业务层用于控制事务的重复代码就都可以删掉了。
public class AccountServiceImpl implements IAccountService{
private IAccountDao accountDao;
public void setAccountDao(IAccountDao accountDao) {
this.accountDao = accountDao;
}
@Override
public void transfer(String souceName, String targetName, Float money) {
System.out.println("transfer......");
Account source = accountDao.findAccountByName(souceName);
Account target = accountDao.findAccountByName(targetName);
source.setMoney(source.getMoney() - money);
target.setMoney(target.getMoney() + money);
accountDao.updateAccount(source);
accountDao.updateAccount(target);
}
}
|
所以测试类中:
@RunWith(SpringJUnit4ClassRunner.class)
@ContextConfiguration(locations = "classpath:bean.xml")
public class AccountServiceTest {
@Autowired
@Qualifier("proxyAccountService")
private IAccountService as;
@Test
public void testTransfer() {
as.transfer("aaa","bbb", 100f);
}
}
|


