/** * Static helper that can be used to run a {@link SpringApplication} from the * specified source using default settings. * @param primarySource the primary source to load * @param args the application arguments (usually passed from a Java main method) * @return the running {@link ApplicationContext} */ publicstatic ConfigurableApplicationContext run(Class<?> primarySource, String... args){ return run(new Class<?>[] { primarySource }, args); }
/** * Static helper that can be used to run a {@link SpringApplication} from the * specified sources using default settings and user supplied arguments. * @param primarySources the primary sources to load * @param args the application arguments (usually passed from a Java main method) * @return the running {@link ApplicationContext} */ publicstatic ConfigurableApplicationContext run(Class<?>[] primarySources, String[] args){ returnnew SpringApplication(primarySources).run(args); }
/** * Indicates a {@link Configuration configuration} class that declares one or more * {@link Bean @Bean} methods and also triggers {@link EnableAutoConfiguration * auto-configuration} and {@link ComponentScan component scanning}. This is a convenience * annotation that is equivalent to declaring {@code@Configuration}, * {@code@EnableAutoConfiguration} and {@code@ComponentScan}. * * @author Phillip Webb * @author Stephane Nicoll * @since 1.2.0 */ @Target(ElementType.TYPE) @Retention(RetentionPolicy.RUNTIME) @Documented @Inherited @SpringBootConfiguration @EnableAutoConfiguration @ComponentScan(excludeFilters = { @Filter(type = FilterType.CUSTOM, classes = TypeExcludeFilter.class), @Filter(type= FilterType.CUSTOM, classes = AutoConfigurationExcludeFilter.class) }) public @interfaceSpringBootApplication{
/** * Exclude specific auto-configuration classes such that they will never be applied. * @return the classes to exclude */ @AliasFor(annotation = EnableAutoConfiguration.class) Class<?>[] exclude() default {};
/** * Exclude specific auto-configuration class names such that they will never be * applied. * @return the class names to exclude * @since 1.3.0 */ @AliasFor(annotation = EnableAutoConfiguration.class) String[] excludeName() default {};
/** * Base packages to scan for annotated components. Use {@link #scanBasePackageClasses} * for a type-safe alternative to String-based package names. * @return base packages to scan * @since 1.3.0 */ @AliasFor(annotation = ComponentScan.class, attribute= "basePackages") String[] scanBasePackages() default {};
/** * Type-safe alternative to {@link #scanBasePackages} for specifying the packages to * scan for annotated components. The package of each class specified will be scanned. * <p> * Consider creating a special no-op marker class or interface in each package that * serves no purpose other than being referenced by this attribute. * @return base packages to scan * @since 1.3.0 */ @AliasFor(annotation = ComponentScan.class, attribute= "basePackageClasses") Class<?>[] scanBasePackageClasses() default {};
}
这里重点的注解有3个:
@SpringBootConfiguration
@EnableAutoConfiguration
@ComponentScan
逐个来看。
2.3.1.@SpringBootConfiguration
org.springframework.boot.@SpringBootConfiguration 注解,标记这是一个 Spring Boot 配置类。代码如下:
/** * Indicates that a class provides Spring Boot application * {@link Configuration @Configuration}. Can be used as an alternative to the Spring's * standard {@code@Configuration} annotation so that configuration can be found * automatically (for example in tests). * <p> * Application should only ever include <em>one</em> {@code@SpringBootConfiguration} and * most idiomatic Spring Boot applications will inherit it from * {@code@SpringBootApplication}. * * @author Phillip Webb * @since 1.4.0 */ @Target(ElementType.TYPE) @Retention(RetentionPolicy.RUNTIME) @Documented @Configuration public@interface SpringBootConfiguration {
The second class-level annotation is @EnableAutoConfiguration. This annotation tells Spring Boot to “guess” how you want to configure Spring, based on the jar dependencies that you have added. Since spring-boot-starter-web added Tomcat and Spring MVC, the auto-configuration assumes that you are developing a web application and sets up Spring accordingly.
/** * Exclude specific auto-configuration classes such that they will never be applied. * @return the classes to exclude */ Class<?>[] exclude() default {};
/** * Exclude specific auto-configuration class names such that they will never be * applied. * @return the class names to exclude * @since 1.3.0 */ String[] excludeName() default {};
}
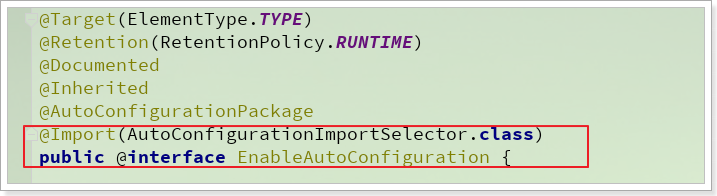
其中,核心的就是顶部注解:
@Import(AutoConfigurationImportSelector.class)
继续来看这两个类
2.4.2.@Import
看源码:
/** * Indicates one or more {@link Configuration @Configuration} classes to import. * * <p>Provides functionality equivalent to the {@code <import/>} element in Spring XML. * Allows for importing {@code@Configuration} classes, {@link ImportSelector} and * {@link ImportBeanDefinitionRegistrar} implementations, as well as regular component * classes (as of 4.2; analogous to {@link AnnotationConfigApplicationContext#register}). */ @Target(ElementType.TYPE) @Retention(RetentionPolicy.RUNTIME) @Documented public@interface Import {
/** * {@link Configuration}, {@link ImportSelector}, {@link ImportBeanDefinitionRegistrar} * or regular component classes to import. */ Class<?>[] value();
/** * Select and return the names of which class(es) should be imported based on * the {@link AnnotationMetadata} of the importing @{@link Configuration} class. */ String[] selectImports(AnnotationMetadata importingClassMetadata);
/** * A variation of {@link ImportSelector} that runs after all {@code@Configuration} beans * have been processed. This type of selector can be particularly useful when the selected * imports are {@code@Conditional}. * * <p>Implementations can also extend the {@link org.springframework.core.Ordered} * interface or use the {@link org.springframework.core.annotation.Order} annotation to * indicate a precedence against other {@link DeferredImportSelector DeferredImportSelectors}. * * <p>Implementations may also provide an {@link #getImportGroup() import group} which * can provide additional sorting and filtering logic across different selectors. * * @author Phillip Webb * @author Stephane Nicoll * @since 4.0 */ publicinterfaceDeferredImportSelectorextendsImportSelector{
/** * Return a specific import group. * <p>The default implementations return {@code null} for no grouping required. * @return the import group class, or {@code null} if none * @since 5.0 */ @Nullable default Class<? extends Group> getImportGroup() { returnnull; } // 其它代码略 }
// DeferredImportSelector /** * Interface used to group results from different import selectors. */ interfaceGroup{
/** * Process the {@link AnnotationMetadata} of the importing @{@link Configuration} * class using the specified {@link DeferredImportSelector}. */ voidprocess(AnnotationMetadata metadata, DeferredImportSelector selector);
/** * Return the {@link Entry entries} of which class(es) should be imported * for this group. */ Iterable<Entry> selectImports();
protected List<String> getCandidateConfigurations(AnnotationMetadata metadata, AnnotationAttributes attributes){ // 利用SpringFactoriesLoader加载指定类型对应的类的全路径 List<String> configurations = SpringFactoriesLoader.loadFactoryNames(getSpringFactoriesLoaderFactoryClass(), getBeanClassLoader()); Assert.notEmpty(configurations, "No auto configuration classes found in META-INF/spring.factories. If you " + "are using a custom packaging, make sure that file is correct."); return configurations; }